Learn to Code (Part 2): Overcoming the CSS learning curve by mastering syntax, the cascade, and how specificity breaks the cascade
The view from 20,000 feet
HTML without CSS (Cascading Style Sheets) is a truly unremarkable thing to look at. That is the good and the bad news.
You are about to create many projects that use both HTML and CSS that do not match the polished examples that you have come to expect from the websites and apps that you already use.
You are going to judge yourself constantly due to the vast gulf that exists between what your project looks like and what you think they should look like based on your learned expectations.
The single most dangerous thing to our learning in the beginning is the simple, undeniably grand expanse between our expectations for the visual elements of a website and what we are currently capable of.
With that mind, let us set a few things straight up front:
- There is no shortcut to mastering CSS and creating polished User Interfaces with HTML and CSS. There is no jumping the line here.
- Creating hundreds of projects that fall short of our expectations IS the process of becoming great at this.
- Every 'failed' attempt at doing a thing - be it with HTML, CSS or JavaScript - we are learning, whether we know it or not. So nothing - nothing - is lost in these early attempts and experiences - it just might not be obvious to you at the time of how or why it is valuable.
Syntax
The general syntax for a CSS rule adheres to the following format:
selector {style-attribute: style-attribute-value;}
Let's break this down line by line.
First, we have a selector. CSS gives us the ability to apply style rules to HTML elements. In order to do that, we use a 'selector' to identify an element or elements.
A CSS selector can take the form of three main possibilities:
- an HTML element-selector.
- a class name
- an id name
Here is some sample HTML that we'll use to demonstrate these three selectors.
Element Selectors
First, an element-level selector:
<h1>Four Satellites</h1>
If we wanted to style this <h1> tag by changing the text color to red, we could reference it in our CSS like this:
h1 {color: red;}
If we had set out to style that <h1> in that way, we would be successful in this case.
However, because we are using the HTML element-level selector in our CSS - the browser will try to apply these style declarations (e.g. making the text color red) to all <h1> tags on our site.
This type of selector - while useful for general styling rules - is the least specific. We'll dive deeper into specificity shortly.
For now, let's look at more examples.
Class Selectors
If I only wanted a certain number of <h1> tags to have the text color of red, and I wanted to declare in my HTML markup which ones would have that style, I could leverage a class-level selector.
In my HTML, I would declare a class like this:
<h1 class="headline">Four Satellites</h1><h1>This blog post is about CSS</h1><h1 class="headline">This example involves different selectors</h1>
Then, in our CSS:
h1 {color: blue;}.headline {color: red;}
We can reference class-level selectors in our CSS by using the dot-notation. The . in .headline tells the browser that this set of styling rules should be applied to elements that that the value of headline in its class attribute. We can add class attributes to our HTML by adding the class="class-name-goes-here" inside of the < and > carrots of the opening html tag.
The Cascade
Using our example from above, this is how the CSS will be applied to our HTML:
- All
h1tags will have a text color of blue. - All elements that have a class name of
headlinewill have a text color of red. - If an
h1tag had a text color of blue, but thath1tag also has a class name ofheadline, the style rule for making the text color blue will be overridden by the style rule that makes the text color red.
In other words, both sets of style rules are being applied simultaneously - but the last one in the sequence wins out and takes precedence. This is partly due to the fact that CSS is interrupted top-down, meaning that a style rule on line 1 could be over-ridden further down on line 200 if there is a valid selector that references the same HTML element.
This is often referred to as the cascade of CSS. The style rule that comes last wins *.
* Selector specificity will break this cascade-behavior in some cases. We'll explore further in later examples. So when we talk about the cascade, it is generally true, but there are reasons (which we will discuss) why it might not be as consistent as we might otherwise interpret it to be.
ID Selectors
The last selector example involves the use of the HTML id attribute. Similar to how we applied classes, we can apply an id.
<h1 id="the-headline">Four Satellites</h1>
And then, in our CSS:
#the-headline {color: black;}
The key differences between an id selector and a class selector include:
- IDs can be used only once on the page - making them significantly more specific than the either element-level and class-level selectors
- We use the
#symbol to reference anidselector in our CSS (instead of the dot notation for class names)
Specificity
Knowing how CSS calculates specificity under the hood is critical to CSS mastery. Why? Because specificity can and does break the cascade in our stylesheets - and knowing why that happens means you can debug those issues when they arise that much more effectively.
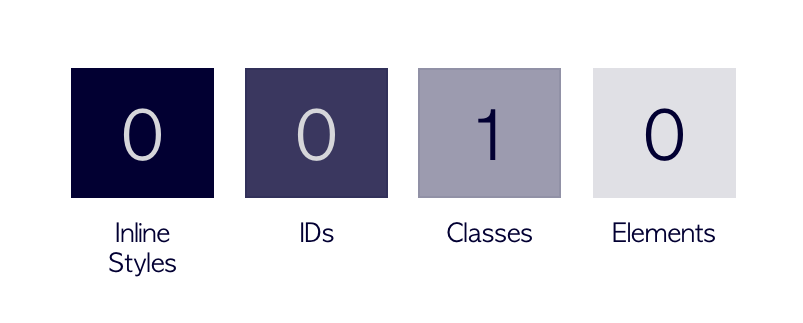
So first, let's talk about the regions of specificity that are available to us. We've already discussed three of them.

For every selector we use in our CSS, the specificity calculation attributes 1 point to each region that is used.
To illustrate this, we'll calculate our <h1> examples.
h1

.headline
#the-headline

The specificity score here is calculated by adding each region's value. In the above example, the total value is 1.
If we were comparing one class selector to another, they would both have a value of 1, and they would both occupy the classes region. Meaning they have equal specificity. It is in this scenario that the cascade would be applied and would win.
If, however, we compared a class selector with an element selector - they would both have a total specificity score of 1, but the class selector would win because it occupied a more specific region. It is a scenario like this when - depending on the order of our style rules, the cascade would likely break.
It gets more convoluted when we use multiple selectors to define a style rule set.
Chaining Selectors to Increase Specificity
So far, we have used CSS selectors using a single selector. But often, projects utilize a combination of selectors chained together.
Let's take a look at some examples.
<h1 class="title headline lrg-text">Four Satellites</h1>
Here, our h1 has three class names.
If we referenced this element like so:
.title {color: red;}
...it would have a specificity score of 1, weighted by occupying the classes region.
If, however, we said:
.title.headline.lrg-text {color: black;}
...we would be saying, OK, for every element that has a class name of title AND headline AND lrg-text, apply the following styles...
If just a single one of those class names is missing from the HTML element, the style rules that we define in the curly brace block in our CSS would not be applied to that element.
We can also combine selectors to drill down specific elements under specific circumstances. For example, consider we have the following HTML:
<body><div class="wrapper"><p>A nested paragraph</p></div><p>A non-nested paragraph</p></body>
I could leverage a selector combination to only style the p tags nested inside of the wrapper class.
.wrapper p {color: red;}p {color: black;}
Here, when we separate selectors by a SPACE, we infer hierarchy. We are saying, for all the paragraph tags inside of every element that has a class of wrapper, let's make that text red.
Furthermore, because the combination of selectors has greater specificity than the style rule further down in our stylesheet where we say all p tags should have black text - the nested paragraph will still be red.
This is specificity at work.
So chaining selectors together can do two things:
- We can leverage chaining to increase our overall specificity score.
- We can leverage chaining to narrow down when and under what conditions in which our styles are applied.
Let's look at two more examples of selector combinations, and evaluate which one would be more specific.
.wrapper .headline #first-letter
body div.wrapper h1.headline span#first-letter
Which one do you think has a greater specificity?
Why?
Knowing how this happens is half the battle. But determining exactly how the specificity shakes out can be tricky. We don't always own the code bases we are charged with modifying, and so sometimes we will need to write CSS that will override existing styles.
To help you make this determination, I suggest using the CSS specificity calculator where you can easily compare two sets of CSS selectors.
How to apply CSS
There are three main options of applying CSS to our page.
First, we can create what is known as an internal stylesheet.
To create an internal stylesheet, we can use the style tag nested in the <head> or our HTML. Inside of that style tag, we can write CSS and the CSS-syntax will be respected.
This is what an internal stylesheet would look like:
<!DOCTYPE html><html lang="en"><head><title>Document</title><style>h1 {color: black;}</style></head><body>...</body></html>
This method is good for small snippets of CSS or quickly adding styles on-the-fly, but as our style rules grow - this method's effectiveness breaks down. It makes our HTML potentially thousands of lines long, making it hard to navigate, manage and update.
To help us with this, we can apply styles using an external stylesheet.
To create one, you simply create a new file in your projects directory - for instance, styles.css - and you reference it in the <head> using a <link> tag like this:
<!DOCTYPE html><html lang="en"><head><title>Document</title><link rel="stylesheet" href="styles.css" /></head><body>...</body></html>
We write our CSS in the styles.css file, and our code editor should pick up the .css file extension and give us nice CSS-related syntax highlighting.
Whether you are using an internal stylesheet, an external stylesheet, or some combination of the two, these applications of CSS to our page does not impact how specificity is calculated. The order of our stylesheets may, however, impact how styles cascade.
The last method that we'll cover here involves the use of inline styles. This is where we apply style rules directly to HTML elements directly. We do this by writing our style rules inside of the HTML style attribute. It looks like this:
<h1 style="color: red;">Four Satellites</h1>
This is, as we illustrated earlier, is the most specific application of CSS, and can only be over-ridden by the !important flag or directly modifying the styles inline via JavaScript - both which we will not cover in this section. Simply know that these options exist. For now, we are going to avoid modifying styles in this way - these methods to override inline styles are our nuclear option: to be used as a last resort.